To move a novel into BlurbBio, export it as a Word .docx (Word, Scrivener, Google Docs, Sudowrite and Novelcrafter can all make one), then open your book in BlurbBio, click Import at the top of the Manuscript panel, and drop the file. The importer detects chapters, scenes and front matter, shows you the result to correct, and saves nothing until you press Import. Clean heading styles in the source file are the single biggest factor in a clean split.
This guide covers the export step for each app, how to prepare the file so chapters split where you expect, and what the importer does at each stage. Every statement about BlurbBio's importer below was checked against the application's code, not its marketing pages.
Step 1: Export from your writing app
A .docx is the safest common format. BlurbBio reads several others (listed further down), but .docx comes out of every major writing app and keeps italics, bold and footnotes.
Microsoft Word
If your manuscript is already a .docx, there is nothing to export. If it is an older .doc or another format, Microsoft's instructions are to go to File > Save As and pick the format under Save as type (Windows) or File Format (Mac). For a manuscript, choose Word Document (.docx).
Before saving, apply heading styles to your chapter titles if you haven't. Microsoft's steps: select the text, then on the Home tab choose a heading style from the Styles gallery. Use the same style (Heading 1 is the usual choice) for every chapter title. This matters more than anything else in this guide; see "How chapters are detected" below.
Scrivener
Scrivener writes your book as many separate documents in its binder, so you export by compiling. Literature & Latte's guide (Kirk McElhearn, December 2025) says to choose File > Compile, which opens the Compile Overview, then pick .docx from the Compile for menu at the top. Two things from the same guide are worth checking first: compile only includes items in the top folder, "named Draft or Manuscript depending on the template," and you can uncheck items to leave them out of the compile.
There is a second route. BlurbBio can read a Scrivener project directly if you zip it: on a Mac, right-click the .scriv project in Finder and choose Compress, then drop the .zip. The importer follows your binder instead of guessing from headings. A top-level document becomes a chapter, a top-level folder becomes a chapter whose documents are its scenes, and a folder of folders becomes a Part. Like Scrivener's own compile, it imports only the Draft or Manuscript folder and leaves out documents not included in Compile (research and trash stay behind).
Use the .zip route if your binder is already organized the way you want the book; use Compile if your chapter structure lives in compile settings rather than in the binder.
Google Docs
Google's help center gives the download path: open the document, then "At the top, click File," then "Download," and choose a file type. Pick the Word (.docx) option.
You can also skip the download. BlurbBio's import dialog accepts a pasted Google Docs link if the document is shared as "Anyone with the link can view." It copies the document once as a .docx and keeps no link to it afterward. Documents over 4 MB by this route (usually ones with many images) need the download method instead.
Sudowrite
Sudowrite's help page (updated January 2026) describes an Export as 1 doc option in a project's More menu (•••), which merges all of your documents into one .docx "in the order that they appear in your project's left bar (from top to bottom)." Put your chapters in reading order in the left bar first. The same page notes that "your Story Bible is not included in the resulting file," so characters and worldbuilding notes need to be moved separately.
Novelcrafter
Novelcrafter's help says "You can find the export option at the bottom of the sidebar" on the left, and that you can export as a Word .docx or markdown. Its options let you choose which acts, chapters and scenes to include and whether to export scene summaries, prose or both. Export prose only, or your summaries will arrive as manuscript text.
Step 2: Prepare the file so chapters split cleanly
Ten minutes in the source file saves an hour of fixing in review. The importer is good at structure, but it can only find what the file actually marks.
How chapters are detected
These are the rules in the import code, in plain terms. They apply to Word, text and Markdown files and to the formats read in the browser alike:
- Heading styles. If you use heading styles, the highest heading level used at least twice marks a chapter start. Heading 1 on every chapter title is the cleanest signal there is.
- "Chapter" lines. A line such as Chapter 12, Ch. 12, Chapter Twelve or Chapter XII, optionally followed by a title (Chapter 12: The Ledger), starts a chapter. A title on the line right after a bare "Chapter 12" is picked up as that chapter's title.
- Parts. Lines beginning Part, Book, Act or Volume plus a number become Part dividers.
- Named sections. Prologue, Epilogue, Dedication, Contents, Foreword, Acknowledgments, About the Author, Glossary and similar titles are typed as front or back matter. Interludes count as chapters.
- Fallbacks. With no headings and no "Chapter" lines, a bare number (12 or XII) set apart as a heading, or a line in noticeably larger type, can start a chapter.
- Nothing found. If the file has no detectable headings, the whole book comes in as one chapter, and the review screen offers to split it at each page break or roughly every 3,000 words.
Two practical consequences. Chapter title lines should be short (the code ignores lines over 90 characters) and shouldn't end in a comma or period, since an unstyled line ending that way reads as prose. And the text before your first chapter (title page, copyright) becomes an "Opening pages" or Title Page section you can keep or untick.
Scene breaks
A line holding only a common scene-break mark becomes a scene divider: ***, * * *, #, ###, ---, ~~~, §, ⁂, three bullets and several others. If you use an unusual ornament, the review screen flags it and offers to treat it as a scene break. Using one mark consistently keeps things simple.
What comes through, and what doesn't
From the import code's own list: italics, bold, footnotes and endnotes, and links are kept. Images and text boxes are not imported, tables arrive as plain paragraphs, small caps become normal text, Word comments are left out, and tracked deletions are left out. A table of contents in the file is flagged, because contents pages are rebuilt when you export.
So, before exporting: accept or reject every tracked change, resolve comments, delete the table of contents, and note any images you will want to add back in the editor.
Step 3: Import into BlurbBio
Open the book you want the manuscript in, and click Import at the top of the Manuscript panel on the left. (A brand-new, empty book also shows an Import button in the middle of the panel.)
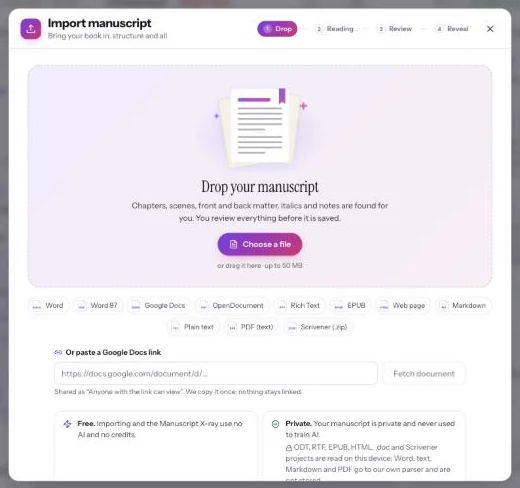
- DropDrop a file, browse for one, or paste a shared Google Docs link. On the Free plan, the dialog shows the page limit before you upload.
- ReadingWord (.docx), text, Markdown and PDF files are read on BlurbBio's import service; ODT, RTF, EPUB, HTML, .doc and Scrivener zips are read in your browser.
- ReviewChapters, parts, scenes and front and back matter are detected. Rename, re-type, merge, split, reorder or untick anything. Nothing is saved yet.
- ImportOne all-or-nothing save: if anything fails, your book is left as it was. Undo import removes the imported chapters afterward.
Drop
You can drop a file, browse for one, or paste a Google Docs link. The accepted types are Word (.docx and older .doc), OpenDocument (.odt), Rich Text (.rtf), plain text, Markdown, EPUB, HTML, PDF (text layer only; a scanned PDF has no text to read) and Scrivener projects as a .zip. Apple Pages files can't be read directly; the dialog tells you to export to Word from Pages first. Files can be up to 50 MB. Password-protected files and documents with macros are refused with an explanation, so save a plain copy first. Italics and bold can't be read from a PDF, so use one only when nothing else is available. DRM-protected ebooks can't be read either: import your original manuscript.
The drop screen also states the cost up front: importing, and the summary that follows, use no AI and no credits.
Review
This is the step that matters. The importer shows every detected section in a list, with the text alongside, and nothing is saved until you press Import. You can:
- rename a section, or change its type (chapter, part, front matter, back matter);
- untick a section to leave it out;
- move sections up or down, or merge one into the section above;
- split a section at any paragraph ("Start a chapter here"), at every page break, or every so many words.
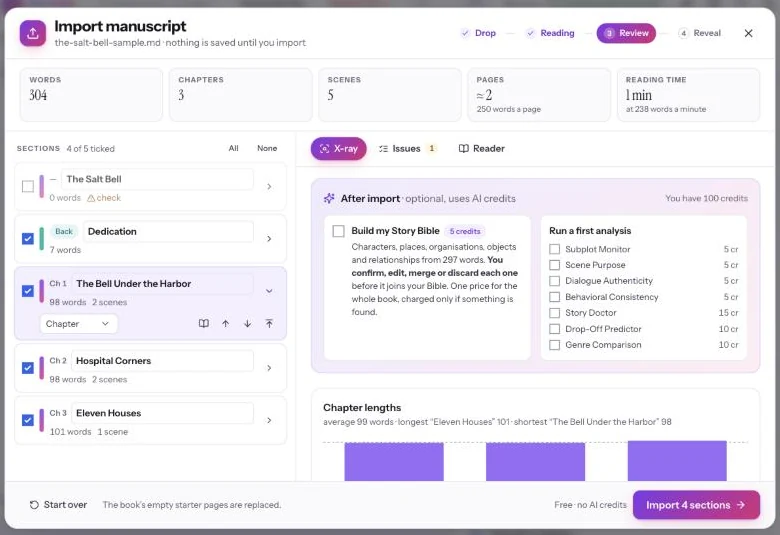
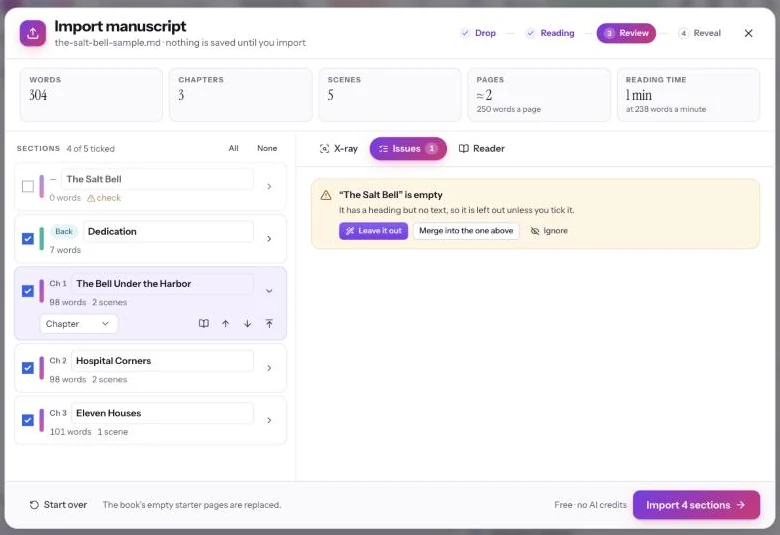
Alongside sits the Manuscript X-ray: word, chapter and scene counts, estimated pages and reading time, chapter lengths as a chart, the front and back matter found, the fidelity list above, and point-of-view and tense hints. An Issues list flags likely problems with one-click fixes: a chapter several times longer than your typical chapter (often a missed heading), a very short chapter (often a line mistaken for a heading), two sections with the same heading, an empty chapter, or a dedication hiding on the title page.
If you close the dialog mid-review, the review is kept in that browser (for up to seven days) so you can resume it.
Choose how it lands
If the book already has text, you can have the manuscript added after your existing pages. A third option, New draft: update chapters, lets you go chapter by chapter, updating the ones that changed, adding new ones and removing ones you cut; it is preselected when the file looks like a new draft of the same book.
On the Free plan a book holds up to five chapters (the dialog calls them pages), counting the ones already in the book. Front and back matter and Part dividers count toward that, so if you tick too many, the review tells you how many fit. The Writer and Author plans have no chapter limit.
Import, and undo if needed
Pressing Import saves everything in one all-or-nothing step: if anything fails, your book is left as it was. The final screen shows the totals and an Undo import button, which removes the imported chapters. Imported words don't count toward your daily writing goal or streak, which are kept for words you write in BlurbBio.
Step 4 (optional): Build your Story Bible from the import
Under "After import," the review screen offers optional AI steps, each with its cost shown before anything runs.
On the Free plan, this is where your one free automatic Story Bible build lives: one per account, reading up to 10,000 words, with no credits used. It is ticked by default when you have it available, and you can untick it. It reads your chapters in order (plus any prologue, epilogue or interlude) and passes over any chapter that would take it past 10,000 words rather than cutting it off. It finds characters, places, objects and relationships, and everything it finds arrives as a suggestion: you confirm, edit, merge or discard each one before it joins your Story Bible. After that, the Free Story Bible is manual.
On the Writer and Author plans, the same build reads the whole book for a flat credit price shown on screen, charged only if it finds something, and you can tick AI analyses (such as Story Doctor, Scene Purpose or the Drop-Off Predictor; some are Author-plan only) to start once the chapters land; each charges its own listed credits.
Whichever plan you are on, a Story Bible is easier to keep accurate when it starts from the manuscript you actually wrote. Our guides on how to build a story bible and making a story timeline cover what to add by hand, and the continuity checker explains how new chapters are compared against that canon.
When the split goes wrong
Most import problems trace back to the source file:
- One giant chapter. No heading styles and no "Chapter" lines. Use the split-at-page-breaks fix in review, or go back and apply Heading 1 to every chapter title.
- Too many chapters. A body-text line was styled as a heading (often a centered, all-caps line). Merge it into the section above, or fix the style in the source.
- Stray words between scenes. An unrecognized scene-break ornament. Accept the "treat it as a scene break" fix.
- Missing passages. Check for text boxes or tracked deletions in the source file.
If the import is wrong in ways that would take long to fix, press Undo import, correct the source file, and import again. That is usually quicker than fixing twenty chapters by hand. For the shape your manuscript should have before you send it anywhere else, see our guide to standard manuscript format.